How to adjust your steel
Here's how to tweak your steel guitar and adjust the pedals and knee levers for proper and comfortable operation. There is also information on how to change the action (shorter, longer, easier, etc.) of the pedals and knee levers. Trouble shooting guides are provided to assist you in diagnosing causes of your steel guitar's inability to "stay in tune".
Pedals
- Cross-shaft slack
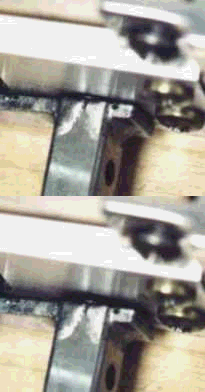
Make sure your cross-shafts have a small amount of slack (about 1/32 inches).
The slack can be observed as a small gap which appears between the front rail and the cross-shaft when moving it (as shown above). Some Guitars may use thrust springs to hold the shaft against the front apron or rail. They should still demonstrate slight movement.
- Pedal stop slack
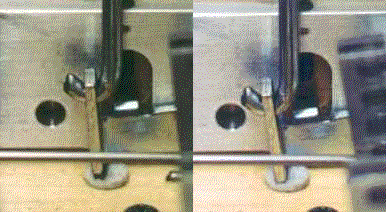
Make sure your pedals have a small amount of slack in the travel before they cause the tuning nuts to engage, the fingers which raise and lower the strings.
The slack can be observed as a small gap which appears between the pedal and the guitar body when moving it (as shown above). Most pedal steel guitars use 1 of 2 different systems to adjust the pedal slack. Whichever system the pedals use, they should still demonstrate a slight amount of slack in the travel before engaging the changer fingers.
To adjust the different types of pedals follow these steps:
Type 1 stops
Type 1 pedal stops feature adjustable stops which the pedals engage at the end of their travel (MSA, MCI, Sho-Bud, Carter, Mullen).
1. Tune the guitar to proper pitch.
2. Step on the pedal.
3. Tune the raise (or lower) on the string that travels the farthest. Plain strings require more travel than wound ones. The smaller the gauge, the greater the travel.
4. Release the pedal and check the open tuning. If the string returns to proper pitch, you have enough travel. If the string comes back sharp, it is an indication that you don't have enough travel.
5. Adjust the pedal stop (usually a screw of some type) to allow more travel to the pedal bell crank before it engages the stop screw.
6. Re-check the pedal for the correct amount of slack in its travel.
Type 2 stops
Type 2 pedal stops feature fixed, nonadjustable stops which the pedals engage at the end of their travel (Zum, Emmons, Derby).
1. Tune the guitar to proper pitch.
2. Step on the pedal.
3. Tune the raise (or lower) on the string that travels the farthest. Plain strings require more travel than wound ones. The smaller the gauge, the greater the travel.
4. Release the pedal and check the open tuning. If the string returns to proper pitch, you have enough travel. If the string comes back sharp, it is an indication that you don't have enough travel.
5. Adjust the slack adjustment screw on the pedal bell crank to allow more travel to the pedal. The pedal bell crank is attached to the cross shaft and is the part into which the pedal rod hooks.
6. Recheck the pedal for the correct amount of slack in its travel.
- Pull rod slack
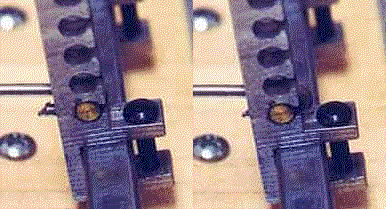
There is another way to test for the required slack on some pedal steel guitars: Check the amount of travel in the pull rods. Make sure they are capable of a slight amount of motion before being engaged.
- Pedal height
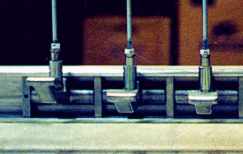
Adjust the height of the pedals so that they are comfortable and easy to operate. Typically, you will find it better to raise the first pedal so you will not accidentally engage it and you can easily rock on and off while holding the second pedal.
Adjusting the pedal height
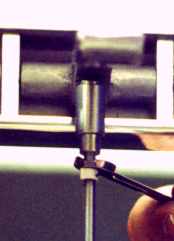
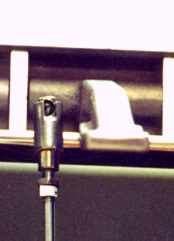
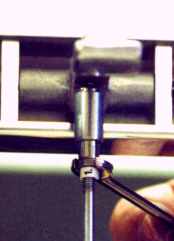
To adjust the pedal height, do the following:
1. Loosen the locking nut
2. Turn the quick disconnect to change the height. Turning it clockwise will shorten the rod and raise the pedal. Turning it counterclockwise will lenghthen the rod and lower the pedal.
3. When the adjustment is complete, tighten the locking screw to prevent the quick disconnect from coming loose during transport.
Knee Levers
- Tilt and travel
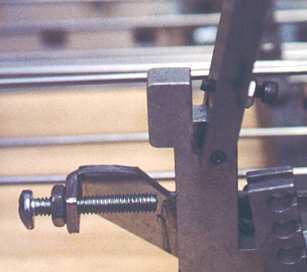
Most knee levers have two adjustments:
Tilt - useful only for comfort and alignment. (small screw shown)
Travel - necessary to maintain the correct amount of slack and travel for trouble free operation (large screw shown)
Make sure your knee levers have a small amount of slack in the travel before they cause the tuning nuts to engage, the fingers which raise and lower the strings. The slack can be observed as a small amount of movement of the pull rod or rotation of the cross shaft and pull bar when moving it (as shown above). Most pedal steel guitars use 1 of 2 different systems to adjust the knee lever slack.
Note: Some guitars may use both systems, one for knee levers that move to the left and the other for knee levers that move to the right.
Whichever system the knee levers use, they should still demonstrate a slight amount of slack in the travel before engaging the changer fingers. We recommend you familiarize yourself with the operation of the different types of knee levers as they apply to your steel guitar.
To adjust the different types of knee levers, follow these steps:
Type 1 knee levers
Type 1 knee levers feature adjustable stops which the pedals engage at the end of their travel (shown above).
1. Tune the guitar to proper pitch.
2. Activate the knee lever.
3. Tune the raise (or lower) on the string that travels the farthest. Plain strings require more travel than wound ones. The smaller the gauge, the greater the travel.
4. Release the knee lever and check the open tuning. If the string returns to proper pitch, you have enough travel. If the string comes back sharp (flat for lowers), it is an indication that you don't have enough travel.
5. Adjust the knee lever stop (usually a screw or adjustable assembly of some type) to allow more travel to the knee lever mounting bar before it engages the stop screw.
6. Re-check the knee lever for the correct amount of slack in its travel.
Type 2 knee levers
Type 2 knee levers feature fixed, non-adjustable stops which the knee levers engage at the end of their travel.
1. Tune the guitar to proper pitch.
2. Activate the knee lever.
3. Tune the raise (or lower) on the string that travels the farthest. Plain strings require more travel than wound ones. The smaller the gauge, the greater the travel.
4. Release the knee lever and check the open tuning. If the string returns to proper pitch, you have enough travel. If the string comes back sharp (flat for lowers), it is an indication that you don't have enough travel.
5. Adjust the position of the knee lever or the linkage to allow enough travel to pull the string to the desired pitch. Do this by pulling the string past the desired pitch, releasing it, and then retuning the open string.
6. Recheck the kne lever for the correct amount of slack in its travel.
- Cross-shaft slack

Make sure your cross-shafts have a small amount of slack (about 1/32 inches).
The slack can be observed as a small gap which appears between the front rail and the cross-shaft when moving it (as shown above). Some Guitars may use thrust springs to hold the shaft against the front apron or rail. They should still demonstrate slight movement.
Action/Feel
- Pull bars and changer hole selection
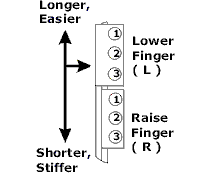
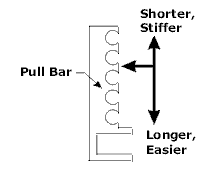
You can change the action on your steel guitar by changing the position of the pull rods at the pull bar and/or the changer fingers.
The first drawing shown at left indicates the change in pedal and knee lever action resulting from a corresponding change of position of the pull rod.
The second drawing shows the fingers and pull bar positions (as seen with the underside of the guitar facing up).
Return Springs
- Length and tension
NOTE: Do NOT attempt this until you have exhausted all other possible remedies to solve problems with the ability of your steel guitar to maintain its tuning. (e.g. lubrication, string ball ends stuck in mechanism, etc.)
The return springs for the lowering finger of the changer should have been properly adjusted at the factory, and normally would require no further adjustment. However, over time, the springs may lose "memory" and not perform well.
The return spring must always be tight enough to hold the lowering finger against the return stop (stop bar) while the raise finger makes its complete travel. The spring must also return the lowering finger to the return stop after it completes its travel.
Test the springs by SLOWLY activating the pedal (or knee lever) of the raise or lower you are having problems with. Watch the lowering finger to make sure it stays against or fully returns to rest against the return stop.
Note: Occasionally the lowering finger may pull off during a portion of a raise and rest against the return stop at the end of the raise. Check for this condition.
If the lowering finger pulls away from the stop bar slightly or does not fully return, you can fix the problem in one of the two following ways:
1. Unhook the spring from the finger, cut one coil from the return spring, and then re-hook the spring on the lowering finger.
2. Turn the spring adjustment screw about one turn clockwiseRecheck the lowering finger to verify that it remains against the stop. Repeat the test and adjustments as required. Helper springs are not necessary on all designs.